Friday, September 25, 2009

My Favorite Faux HDR App

HDR stands for High Dynamic Range - an overly simple explanation is that you get detail in the shadows and highlights. (For a more complete understanding of HDR check out "Modern HDR photography, a how-to or Saturday morning relaxation" on a blog called Memoirs On A Rainy Day.)

With the iPhone, we can create a sort of faux HDR effect to recover detail in highlighted area (provided there is some info there to recover) and we can add fill light in our shadow areas (again provided there is some info there.)

Here's a shot near Baldwin Beach at Lake Tahoe one evening. Notice how the foreground is dark, without much detail. The iPhone exposed for the sky.


I used the Photoforge app which has an HDR setting that allows you sliders to open shadows and recover highlights. It's okay, but no matter how I move the sliders, it ends up being low contrast. That can be good in some cases, but I want a little more drama in this scene.


Here I use the iFlashReady app to open up the shadows - it has 3 flash fill settings and only works on adding light to the dark. Voila! Now it has the kind of drama I'm looking for. This is my favorite faux HDR tool so far.

Friday, September 18, 2009

Mardi Gras Magic

Okay, Dewitt Jones (my spouse aka the Digital Dude) was bored and procrastinating today also. He found some old images from New Orleans and Photoshop play culminated in this remarkable image. Gotta love that avoidance stuff - gets the creative juices flowing.


I'm a Fan of the iPhone

I was sitting at my desk, fanning myself, and procrastinating (read avoiding at all costs) doing my work. As I held a fan up toward the light coming through the sliding glass door, I was struck by its transparency. I grabbed my iPhone and took several shots. I chose one and used the burnt paper filter in the app ArtCamera. Artcamera is one of my favorite apps and I keep going back to it. The "old" quality works well with this image.


And I used the Picasso filter in Art Camera to create this look - I like this photo a lot. Sometimes procrastination leads to fascination leads to art.

Sunday, September 13, 2009

UnBearably Fun iPhone Art

Photographer Rikki Cooke is known to his students, fellow pros, and friends as the Aloha Bear. (Check out his blog of the same name). He has been having way too much fun with his iPhone as those of you who've been following this blog can attest. And his latest 'art' just knocks me out! Check these out:

This is one of the first panoramic shots he created on his iPhone using Pano app. Pretty good shot as is!


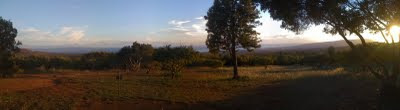
But then he brought it into Photoshop. Here's his processing in his own words: "I put it in ACR (Adobe Camera Raw) where I used the graduated neutral density on the sky and the dodging brush to open up the field. Then Topaz Adjust, then Clean2, Simplify ( but not oil paint, as it didn't work for this image.) Then Topaz sharpen to emphasize the lines, then resize to a larger size 10x34 and Nik's Sharpener Pro with extra sharpening and structure and last a pass through Noiseware. Most of the painting effect was adjusted to taste in Topaz Simplify. And remember all of this is from a phone!" Be sure to click on the panos to see them bigger so you can truly appreciate the changes!


And how did he paint Old Blue - the Toyota Land Cruiser that has carried so many photo students out into the wilds of Moloka`i Hawai`i? Here's his photo path. "Full image from iphone 3g from iphoto, then processing (at same size) in Topaz Adjust, Simplify (most painting to taste) a little emphasis in Clean2, line sharpening in Sharpener, then resize to 15x20 and extra sharpening in Nik's and a pass thru Noiseware. After saving all of this, time to experiment in Sepia B&W. Last image, converted in Nik's Color Efex, then processed in Nik's Silver Efex, with added structure and tinting . Again the richness of this moment was recorded because I had my phone in my pocket as a dutiful husband always on call, actually I could have answered the phone while I was photographing, in the rain yet. Boy are we on to something here?"

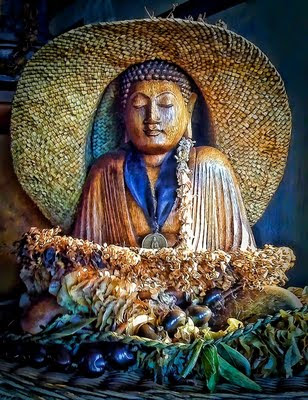
This shot he calls "Laundry Basket Buddy." Here's how it came about:

"This is the full original image straight from iphoto. The thing that is different here is that I'm working from the whole iphone image that is about 4mgs, in the past I was working from an email from the iphone, that was about 1/3 the size and I had to enlarge to 1000 pixels to process in Topaz. After cropping and minor touching up and vignetting and full painting processing in Topaz, the final image is 15x20 and sharp. Again all thanks to having a phone in my pocket for that moment when the light happened to be perfect on the Buddha. I could have even been on the phone while I was taking the photo, talk about " multi- tasking"."

And finally, "here is an experiment in sepia after conversion in Nik's color Efex , and then processing in Nik's Silver Efex , Sharpener , Noiseware and done."


Seriously, we are beginning to wonder why we ever shoot with our Big Girl and Big Boy cameras anymore!

Thursday, September 10, 2009

App Arition - iPhone Style

Robin Robertis does it again using the iPhone and a skillful blend of apps to create this haunting photo.

Here's how she did it:

"Used high con ( 1 of my 1st apps.... i never use... stupid really... i think)
then brought into FotoMuse and ran a layer on it...
opened it again in FotoMuse and ran the same filter.... is there a add
layer in that app ?
then of course back into Photogene for the tape on the edges."

Tuesday, September 8, 2009

Making Magic Photo Art With the iPhone

Rikki Cooke sends this colloborative iPhone digital art photo co-created with artist Lucy Lamkin. Here is the original iPhone photo which Rikki refers to as "dog doo" (not his exact words but you get the drift.)


The image was then brought it into Photoshop and they made the following adjustments: Sky adjusted with targeted adjust tool in ACR, areas around house and tree opened with dodge brush, then opened in photoshop and sized to 1000 pixel. Then visit Topaz Adjust, then Topaz Simplify and oil painting,then Topaz Veracity Sharpen, then size up to 8x10 in PCS4, then sharpen with added "structure" in Nik's Sharpener pro and save and done. Lucy then did some final adjusting of her own. WOW!

Wednesday, September 2, 2009

Art In His Life - Rikki Cooke Does It Again

Pro photographer Rikki Cooke, also known as The Aloha Bear, has photographed a series he calls "Art In My Life" over many years. With his iPhone, he's gone to a whole new level of art in his life. He shot this image of his "Crocs" on the iPhone.


He then downloaded the image to his computer where he used Topaz Labs amazing Photoshop filters to create this extraordinary view of his ordinary shoes. Remember we can use apps to manipulate our photos, but we don't have to stop there! There are no limits when you're making art!